Heirloom Wooden Toy Restoration: Safe Care Steps
Refinishing wooden toys with beeswax and oil is a controlled surface-restoration process, not simply an aesthetic upgrade.
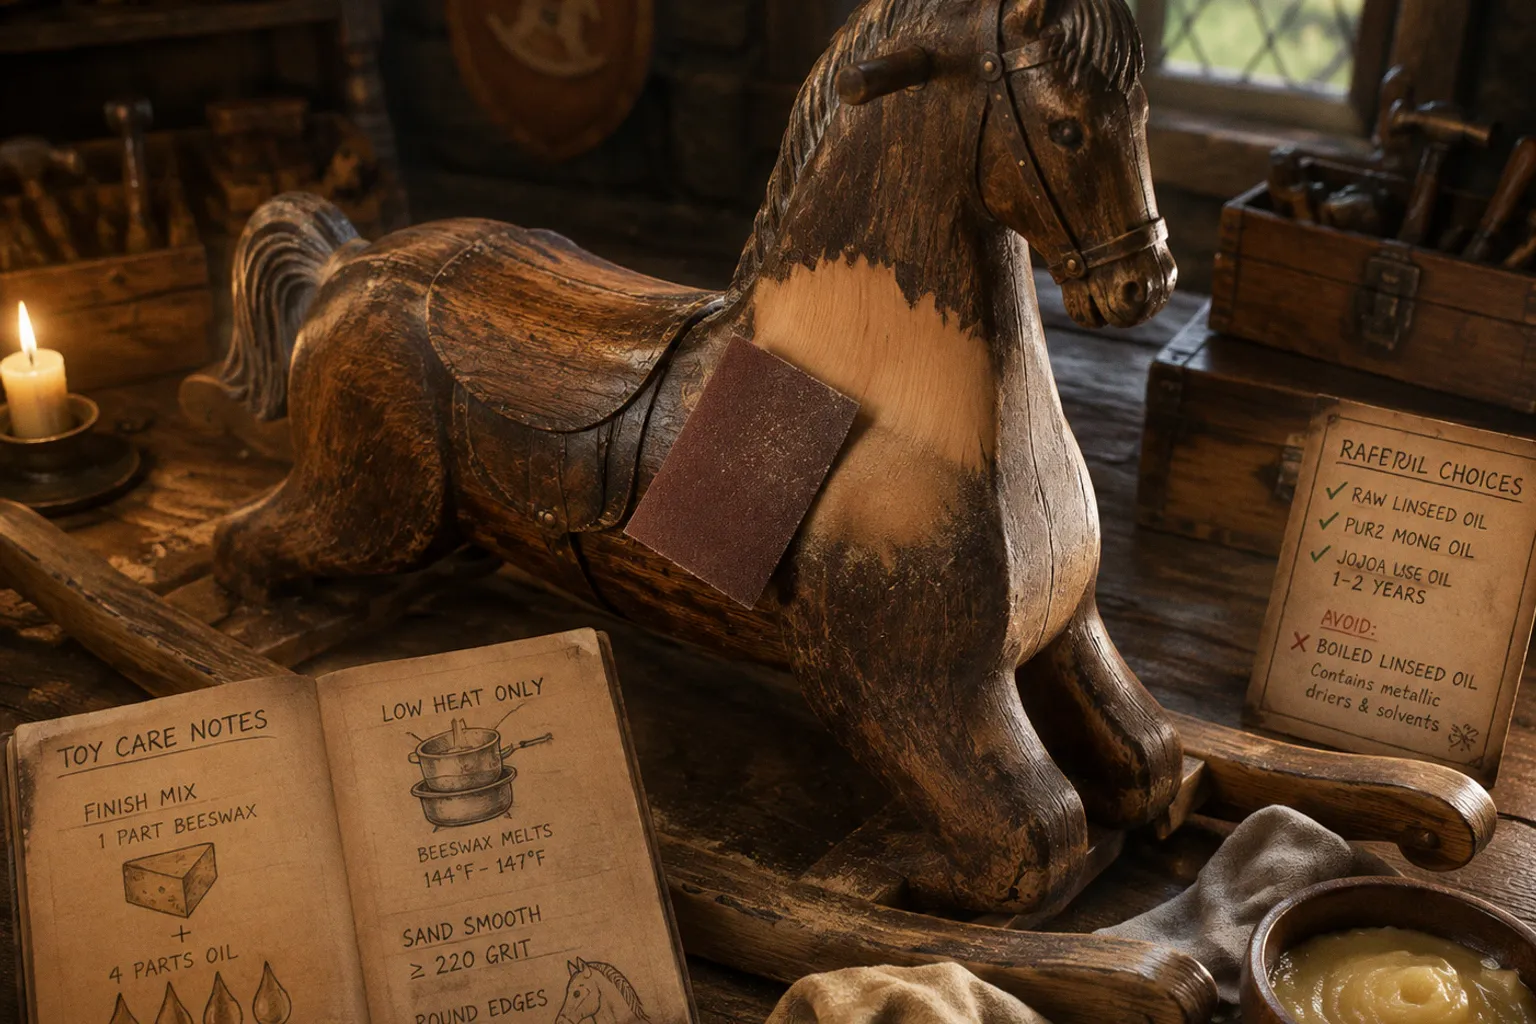
The objective is to remove loose or abrasive material, preserve sound timber, and add a low-toxicity protective layer that can tolerate repeated handling. A suitable finish must remain compatible with a child’s contact with the surface, including hand-to-mouth behavior in younger children.
For most unfinished or lightly worn heirloom toys, a natural beeswax-and-oil polish provides a practical balance between surface protection and repairability. It does not create a waterproof shell. Instead, it saturates and conditions the upper wood fibers, reducing dryness and improving resistance to ordinary handling, moisture traces, and friction.
The restoration sequence is straightforward:
1. Inspect the toy and identify unstable paint, cracks, loose parts, or contamination.
2. Clean the timber without saturating it.
3. Sand only as much as necessary, finishing at least at 220 grit.
4. Prepare a food-grade beeswax-and-oil mixture.
5. Apply a thin layer and allow time for absorption.
6. Buff the surface until it is dry to the touch.
7. Reinspect the toy before returning it to use.
Each step affects safety and durability. Skipping surface preparation usually produces a sticky, uneven finish rather than a stable protective layer.
Preparing the Surface: Sanding and Safety Standards
The first decision is whether the toy should be refinished at all. Heirloom toys can contain several layers of paint, varnish, adhesive, or repair material applied at different points in their history. Without laboratory testing, the exact chemical composition of an old paint layer cannot be established. This matters because sanding can release contaminated dust, and aggressive refinishing may destroy original markings or a historically significant surface.
A toy with intact, stable decoration may require only cleaning and a light conditioning treatment. A toy with flaking paint, exposed splinters, or a heavily deteriorated coating requires a more conservative assessment. Do not treat every aged surface as a candidate for complete stripping.
Initial inspection
Examine the toy under strong, even light. Look for:
- Sharp edges, raised grain, and splinters that can cause mechanical injury.
- Cracks extending through a structural component.
- Loose wheels, axles, beads, knobs, or other small parts.
- Open joints that could separate during handling.
- Peeling, powdery, or blistered paint.
- Darkened areas that may indicate moisture damage rather than ordinary aging.
- Residual adhesive, grease, or an unknown lacquer.
- Components small enough to present a choking hazard to the intended user.
Wooden toys should not be returned to play merely because their finish looks attractive. Structural stability takes priority over surface appearance. If a wheel is loose or a joint has failed, repair that problem before applying polish. Wax can temporarily mask a defect while doing nothing to restore mechanical strength.
Do not immerse an old toy in water. Timber absorbs moisture through end grain, joints, and existing cracks. Swelling can loosen glued connections and create new surface fractures as the wood dries. Use a barely damp cloth for ordinary dirt, followed by immediate drying with a clean towel. For persistent residue, use minimal moisture and avoid leaving the toy in a humid environment.
Sanding without removing more material than necessary
Sanding is intended to eliminate loose fibers, shallow abrasions, and sharp transitions. It is not automatically a requirement to strip the toy to bare wood. Excessive sanding can erase maker’s marks, painted details, rounded profiles, and evidence of original craftsmanship.
Work progressively and inspect the surface after each pass. Begin with the least abrasive paper that can correct the defect. Finish at a minimum of 220 grit for a smooth surface suitable for direct handling. The final pass should follow the direction of the grain where the geometry permits.
Edges require particular attention. A sharp corner concentrates pressure on a small area of skin and is more likely to chip. Round over exposed edges lightly rather than producing a visibly altered profile. On turned parts, dowels, and curved components, use controlled hand sanding instead of pressing the piece aggressively against abrasive paper.
A useful surface standard is tactile rather than visual: the timber should feel consistently smooth when inspected with clean fingertips, with no raised splinters or abrupt burrs. Fine sanding dust must then be removed before finishing. A soft brush or clean, dry cloth is preferable to forcing dust deeper into joints.
A safe finish cannot compensate for an unsafe substrate. Remove splinters, unstable parts, and sharp edges before applying any polish.
The sanding stage also determines how much oil the wood can absorb. A rough surface exposes more fiber and can retain excess finish, while an adequately refined surface accepts a thinner, more uniform coat. The goal is not maximum absorption. The goal is a stable surface with controlled uptake.
Selecting a Child-Safe Finish for Wooden Toys
The finish must be evaluated by composition, curing behavior, and the toy’s likely use. A surface that is appropriate for decorative furniture is not automatically appropriate for a child’s toy. Wooden toys experience repeated gripping, rubbing, occasional contact with saliva, and periodic cleaning. They also need a finish that can be renewed without requiring aggressive chemical stripping.
A simple natural polish uses pure beeswax combined with a food-grade oil. The standard soft-paste ratio is:
| Component | Standard proportion | Function |
|---|---|---|
| Pure beeswax | 1 part | Forms the protective wax phase and improves surface resistance |
| Food-grade oil | 4 parts | Softens the mixture and allows penetration into the upper wood fibers |
| Optional harder formulation | Up to 1 part beeswax to 1 part oil | Produces a firmer paste with less spreadability |
The 1:4 formulation is generally easier to apply as a rub-on treatment. A 1:1 mixture creates a harder paste and a more pronounced wax layer, but it can require greater friction during application and buffing. It may also be less suitable for a large toy with complex contours because the material spreads less readily.
Oil choices
The oil should be food-grade and free from added drying agents, solvents, and fragrance compounds. Food-grade mineral oil, jojoba oil, raw linseed oil, and pure tung oil are among the options used for this type of finish. Product labeling still matters. The word natural does not establish that a formulation is suitable for children’s products.
Boiled linseed oil should not be used. It commonly contains metallic driers and chemical solvents that accelerate drying but make it unsuitable for this application. The fact that it is widely used in woodworking does not make it appropriate for a toy that may be handled or mouthed by a child.
Olive oil also requires caution. It can become rancid over time and is not an ideal choice for long-term storage or heirloom restoration. A finish that smells acceptable immediately after application may not remain stable over an extended period.
Pure beeswax should be free from added polish chemicals, petroleum distillates, dyes, and synthetic drying agents. The finished mixture should have a mild material odor rather than a strong solvent or fragrance odor. Do not add essential oils. Their presence does not improve the protective function and can introduce unnecessary exposure to concentrated aromatic compounds.
Choosing the formulation by use
The toy’s handling pattern should determine the finish thickness and maintenance schedule.
- Daily-use toys: Use a thin 1:4 beeswax-to-oil paste. This formulation is easier to renew and less likely to leave a heavy surface film.
- Occasionally handled heirlooms: The same ratio is usually sufficient, with a longer interval between treatments.
- Display pieces: Apply sparingly. The purpose is surface conditioning, not the creation of a glossy coating.
- Toys with deep cracks or structural damage: Do not rely on wax and oil. The finish is not an adhesive or a structural repair compound.
- Painted toys: Avoid coating over loose or unstable paint. Stabilize the surface through an appropriate conservation approach before conditioning the wood.
A natural beeswax finish is not completely waterproof. It can reduce the effect of ordinary handling and brief moisture exposure, but deep water penetration, prolonged dampness, and repeated washing can still damage timber and joints.
Mixing Your Own Natural Beeswax and Oil Polish
The mixing process requires low heat and clean equipment. Beeswax melts at approximately 144–147°F, just under 150°F. A double boiler provides better temperature control than direct heating and reduces the risk of overheating the wax.
Use a dedicated heat-safe container, a clean stirring tool, and a small storage jar with a secure lid. These tools should not be contaminated with paint stripper, solvent, furniture polish, or other chemical products. The mixture should be prepared in a ventilated area away from children and open flames.
The 1:4 method
Measure one part pure beeswax and four parts selected food-grade oil by volume or by weight, but use the same measurement system consistently. Inconsistent measuring changes the hardness of the final polish.
1. Place the beeswax in the upper section of a double boiler.
2. Warm it gradually until it becomes fully liquid.
3. Add the oil and stir until the mixture is uniform.
4. Remove the container from heat.
5. Transfer the liquid into a clean jar.
6. Allow it to cool until it forms a soft, spreadable paste.
Do not heat the finished mixture aggressively. Beeswax does not need high temperatures to liquefy, and overheating increases handling risk without improving the finish. If using a microwave for small quantities, use very brief heating intervals and inspect the mixture between intervals. A controlled water bath is easier to regulate.
The completed polish should be smooth rather than grainy. If it becomes too hard for the intended application, increase the oil content slightly during a later batch. If it remains excessively greasy after buffing, the application layer is probably too thick or the wood is not absorbing the excess.
Label the container with its contents and preparation date. Store it closed, clean, and away from direct heat. Do not use a mixture that develops an unusual odor, visible contamination, or a changed texture suggesting degradation.
Test before full application
Apply a small amount to an inconspicuous area or a separate piece of comparable wood. This test assesses color change, absorption, gloss, and tactile residue. Natural oils can deepen the apparent color of timber, particularly on light woods. A test area also shows whether an old surface contains a coating that rejects the mixture.
If the test patch remains wet, cloudy, tacky, or uneven after buffing, stop before treating the entire toy. The wood may already have a dense finish, or too much product may have been applied. Refinishing wooden toys with beeswax and oil works best on clean, absorbent timber rather than on a sealed synthetic lacquer.
Applying and Buffing the Protective Layer
Application should be thin and deliberate. A heavy coat does not provide proportionally greater protection. It can create a greasy surface that collects dust, transfers onto skin, and remains soft in recesses.
Use a clean cotton rag or a lint-free cloth. Pick up a small amount of polish and work it into the wood using overlapping strokes. On larger flat surfaces, follow the grain. On rounded or carved parts, distribute the material evenly rather than concentrating it in grooves.
Allow the mixture to sit for approximately 5–10 minutes before the first firm buff. This gives the oil and wax time to interact with the upper wood fibers. For a particularly dry, absorbent surface, the material may be left for up to 1–2 hours before final buffing, provided the toy remains in a clean, dust-free area.
The waiting period should not be interpreted as an instruction to leave a thick layer indefinitely. Once the wood has absorbed what it can use, the remaining surface material must be removed. Buff with a clean section of cloth until the toy no longer feels oily or sticky.
Surface response during application
Different areas of a toy absorb finish at different rates. End grain, exposed joints, and freshly sanded patches may darken more quickly than broad side surfaces. This is normal to a degree, but visible pooling indicates excessive product.
Monitor four properties:
- Absorption: The surface should take up some of the mixture without remaining visibly wet.
- Uniformity: Color and sheen should not vary sharply between adjacent areas.
- Tactile quality: After buffing, the toy should feel smooth and dry rather than greasy.
- Edge behavior: Wax should not accumulate along corners, holes, wheel wells, or carved recesses.
Use a fresh cloth for final buffing if the first one becomes saturated. A saturated rag redistributes excess polish instead of removing it. Cloths containing oil and wax should be stored safely and disposed of according to local fire-safety guidance; oil-soaked materials can present a combustion risk when improperly stored.
Do not return the toy to a child immediately after application. Leave it in a clean, ventilated location until the surface is fully dry to the touch and no strong odor remains. The finish is intended to be low-toxicity when properly selected and applied, but low-toxicity does not mean that a wet product should be available for handling or mouthing.
What not to add
Avoid combining the beeswax mixture with:
- Petroleum-based lacquers or solvent-borne furniture finishes.
- Boiled linseed oil containing metallic driers.
- Unknown commercial polishes with undisclosed fragrance or solvent systems.
- Abrasive cleaners that can embed particles into soft timber.
- Pigments or dyes added without confirming their suitability for children’s products.
- Water-repellent additives designed for outdoor timber.
Each additive changes the exposure profile and the behavior of the finish. A restoration formula should remain simple enough that its ingredients and purpose are understood.
Maintenance Cycles for Daily-Use and Display Toys
A wooden toy does not require constant reapplication. Excessive polishing can produce residue buildup and gradually obscure the natural surface. Maintenance should respond to wear, dryness, and loss of tactile smoothness rather than follow an arbitrary weekly routine.
For heavily handled toys, beeswax-and-oil finishes typically require renewal every 6–12 months. Toys used occasionally or kept mostly on a shelf may require treatment every 1–2 years. These intervals are practical guides, not universal guarantees. Wood species, humidity, handling frequency, cleaning methods, and the thickness of the original finish all affect performance.
A maintenance inspection
Before reapplying, clean the toy with a dry cloth and inspect the surface. Reapply only if the timber appears dry, feels rough, or has lost the protective quality of the previous treatment. If the surface remains smooth and stable, cleaning may be sufficient.
The maintenance sequence is shorter than the initial restoration:
1. Remove dust and surface residue.
2. Check for new cracks, loose parts, or splinters.
3. Lightly smooth isolated rough areas if necessary.
4. Apply a very thin layer of the existing compatible polish.
5. Allow 5–10 minutes for absorption.
6. Buff firmly with a clean cloth.
7. Confirm that no greasy film remains.
Do not repeatedly sand a toy during routine maintenance. Sanding removes wood and can alter fit between moving parts. Reserve it for actual surface defects.
Cleaning after restoration
Use a dry or barely damp cloth. Avoid soaking, dishwashers, steam, and prolonged contact with wet surfaces. If the toy becomes visibly dirty, remove the contamination promptly and dry the timber immediately. A wax-and-oil finish can tolerate ordinary handling, but it does not make wood immune to deep water damage.
Keep restored toys away from prolonged high humidity and direct heat. Rapid changes in moisture content can produce shrinkage, swelling, and joint movement. Store heirloom toys where air circulation is stable and where they will not be compressed under heavy objects.
Typical Restoration Errors
Most failures are procedural rather than material-related. The same problems recur when restoration is approached as a quick polishing task.
1. Applying finish over dust. Dust becomes trapped in the coating and creates a rough surface. Clean the toy after sanding and before application.
2. Using a thick layer to compensate for dry wood. Excess polish remains greasy. Several controlled treatments are safer than one saturated application.
3. Skipping the test patch. An old lacquer or paint layer may reject the mixture or react unpredictably. Test first.
4. Using boiled linseed oil. Drying agents and solvents make it inappropriate for a child-contact finish.
5. Treating structural damage as a cosmetic defect. Wax cannot repair a failed axle, split body, or loose joint.
6. Sanding away original detail. Heirloom value may reside in the shape, paint, or maker’s marks. Remove only unstable or hazardous material.
7. Leaving residue in recesses. Accumulated wax attracts dust and can interfere with moving components.
8. Returning the toy while it is still oily. The surface should be buffed dry and left to settle before use.
9. Assuming natural means waterproof. Beeswax and oil provide conditioning and limited surface resistance, not complete protection from water.
10. Ignoring small detachable components. Restoration does not change the choking risk of a loose bead, wheel, or knob.
These errors are especially significant with traditional wooden toys because their construction often depends on tight mechanical tolerances. A finish applied to an axle, hole, or joint can change movement without improving safety. Keep treatment concentrated on exposed wooden surfaces and remove visible excess from functional interfaces.
The appropriate finish is the thinnest food-grade layer that protects the wood without changing the toy’s mechanical behavior.
A Practical Decision: Restore, Stabilize, or Retire
Not every heirloom toy should return to active play. A toy can have cultural or family value while remaining unsuitable for regular child handling. If the original paint is unstable, the wood is structurally compromised, or small parts cannot be secured, display and documentation may be safer than restoration for play.
Choose restoration for use when the timber is stable, the parts are secure, the surface can be made smooth, and the finish history is sufficiently understood. Choose stabilization and display when the toy has uncertain coatings, fragile decoration, or historical features that sanding would destroy. Choose retirement from child use when structural failure, contamination, or detachable parts cannot be controlled.
This distinction prevents a common category error: confusing improved appearance with improved suitability. The beeswax-and-oil polish is a surface treatment. It does not certify the toy, neutralize unknown paint chemistry, eliminate choking hazards, or correct defective construction.
Final Assessment
A 1:4 mixture of pure beeswax and food-grade oil is a practical natural polish for sound wooden toys that need conditioning and light surface protection. The process depends on disciplined preparation: inspect the toy, sand to at least 220 grit where sanding is required, round sharp edges, apply minimal heat, allow absorption time, and buff away all excess.
For daily-use heirlooms, plan on renewal approximately every 6–12 months. For lightly handled display toys, a 1–2 year interval may be adequate. These treatments extend the service life of timber by maintaining its surface, but they do not convert a damaged or chemically uncertain toy into a safe one.
The definitive standard is functional stability. After restoration, the toy should have smooth wood, secure components, no loose finish, no persistent greasy residue, and no unresolved structural or paint hazards. If those conditions are not met, further polishing is not the correct next step.