Montessori Cylinder Blocks: What to Check Before First Play
A child may be able to hold a knobbed cylinder, carry a wooden block, and even place a few pieces into the sockets without yet being ready for the full Montessori sensorial exercise.
Readiness is not about reaching a birthday and suddenly unlocking the material. It is about whether the child can slow down, notice small differences, use a controlled grasp, and stay with a simple task long enough to discover the pattern.
That is why a careful Montessori cylinder blocks introduction checklist matters. Before first play, look at the set itself, the child’s current coordination, the presentation space, and the way the material allows for self-correction. A well-prepared introduction feels calm and purposeful. A rushed one can turn a beautiful learning tool into a frustrating puzzle with too many pieces.
Start with the material: what a complete set should contain
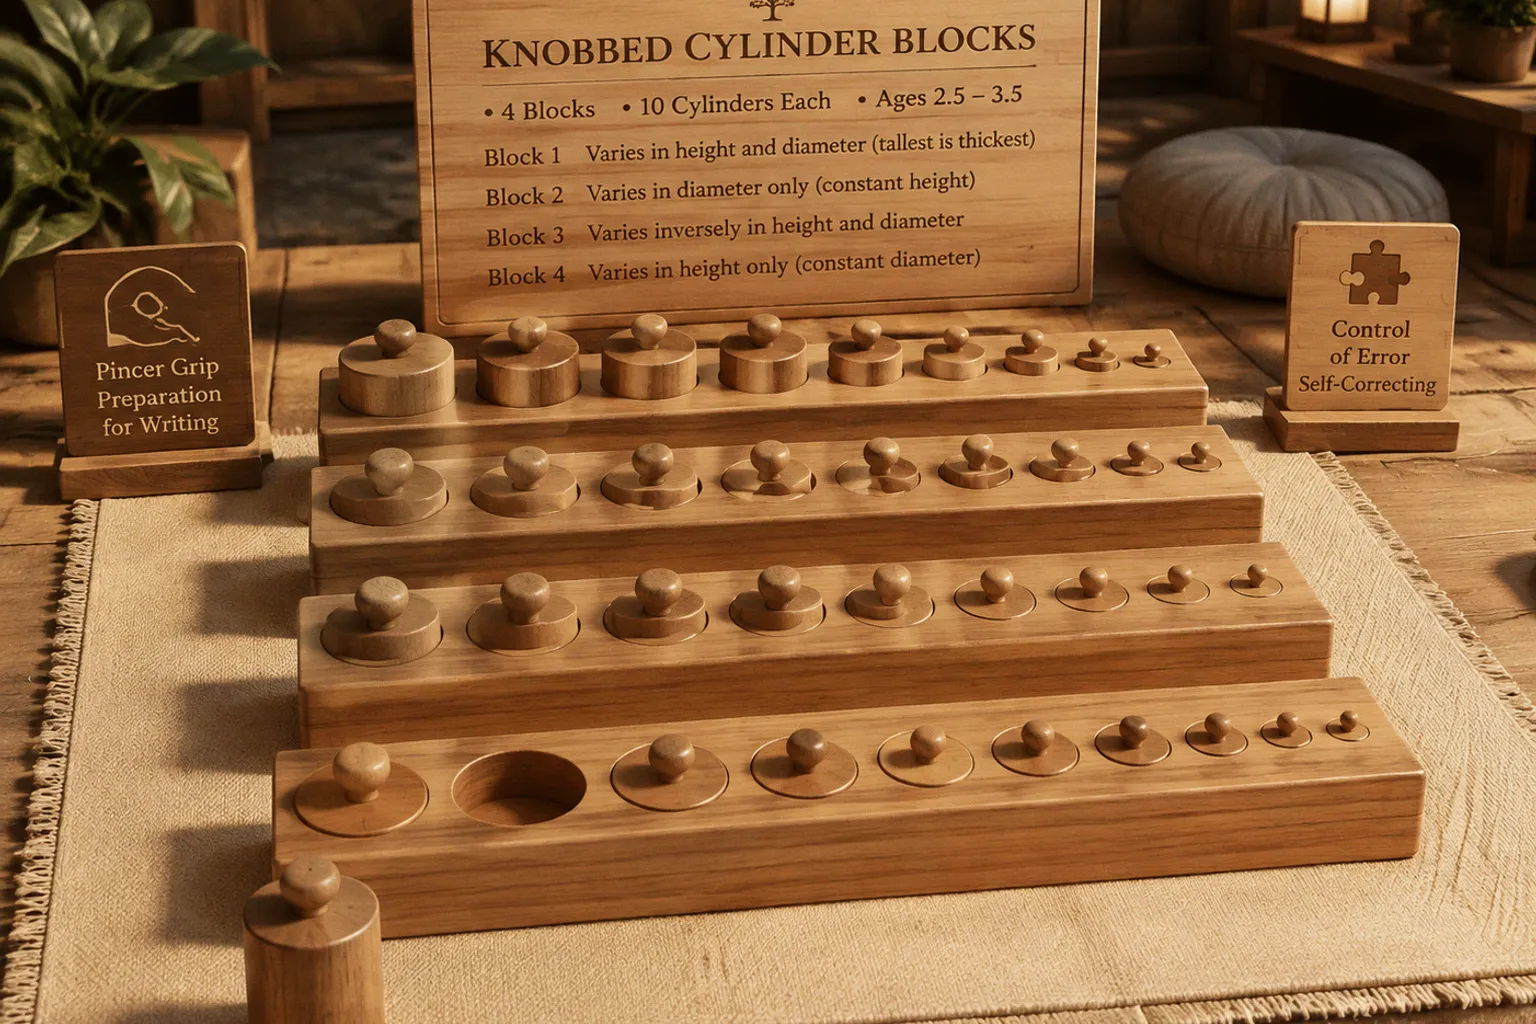
Traditional Montessori knobbed cylinder blocks consist of four solid wooden blocks, with ten inset cylinders in each block. That gives a full set of 40 cylinders altogether. Each cylinder has a small wooden knob designed for grasping, and each socket accepts one cylinder.
The blocks are not four copies of the same activity. Each one isolates a different visual and dimensional challenge. The child gradually learns to notice whether a cylinder is taller, shorter, wider, or narrower, rather than relying on one obvious feature.
Before setting the blocks on a shelf or presenting them to a child, place them together and identify which dimensional variation each block offers:
| Block | What changes | What stays the same | What the child is noticing |
|---|---|---|---|
| Block 1 | Height and diameter change together | No single dimension stays constant | The tallest cylinder is also the thickest, while the shortest is the thinnest |
| Block 2 | Diameter changes | Height remains constant | Which cylinder is wider or narrower |
| Block 3 | Height and diameter change inversely | No single dimension stays constant | The tallest cylinder is the thinnest, and the shortest is the thickest |
| Block 4 | Height changes | Diameter remains constant | Which cylinder is taller or shorter |
In standard sets, the dimensional change between neighbouring cylinders is often arranged in regular increments, commonly around 0.5 centimetres. That systematic sequence is what makes the work different from an ordinary wooden shape sorter. The child is not simply matching colours or fitting random pieces into openings. The material offers a carefully ordered visual and tactile comparison.
Inspection steps before the first presentation
Run your fingers over the wooden surfaces and examine the cylinders at close range. This does not need to become a technical materials audit. You are looking for a safe, smooth, dependable object that can withstand repeated handling.
Check that:
- the wood feels smooth rather than splintered or rough around the edges;
- the knobs are firmly attached and do not wobble when gently handled;
- the cylinders sit securely in their sockets but can be removed without force;
- the sockets are clean and free from loose fragments or packing debris;
- the blocks rest steadily on a table or mat instead of rocking;
- the finish feels even, with no sharp raised areas that could catch a child’s skin;
- the set is arranged in the correct dimensional sequence rather than mixed between blocks.
If you are buying a non-standard or miniature set, do not assume that its specifications match a traditional Montessori material. Adapted toddler cylinder blocks may contain fewer pieces or use a different size. That does not automatically make them unsuitable, but it does mean you should follow the manufacturer’s safety information and inspect the individual product rather than applying the standard set’s dimensions to it.
Small knobs and cylinders deserve particular attention with younger children because they are small parts. A child who still mouths objects, carries materials to the mouth, or has not developed consistent understanding of safe handling may need a different activity for now. A standard introduction is commonly offered between about 2.5 and 3.5 years, but that range is a guide, not a rigid gate. Developmental readiness and the specific design of the set matter more than a number on a calendar.
The best first check is not “Can my child finish the block?” It is “Can my child handle the pieces safely and notice what the material is asking?”
Look for readiness in behaviour, not just age
Children show readiness for knobbed cylinders through their play patterns. You may notice that a child repeatedly lines up objects by size, matches lids to containers, places small items into openings, or returns to a puzzle after an unsuccessful attempt. These behaviours suggest growing visual discrimination and an appetite for ordered, hands-on work.
A child does not need to name dimensions or understand the word “diameter.” Early learning happens through the hands long before it becomes a verbal explanation. The child feels the weight of a cylinder, sees the difference between a narrow and a wide opening, and begins to coordinate the two.
Signs that the material may be a good next step
Look for several of the following, rather than expecting every sign at once:
1. The child can use a small, controlled grasp.
The knob is intentionally small. A child who can pick up beads, chunky pegs, puzzle knobs, or small pieces with the thumb and first two fingers may be developing the hand control needed for the material.
2. The child can carry an object carefully.
Montessori cylinder blocks are usually brought to a work area and returned afterwards. A child does not need perfect grace, but some awareness of carrying and placing helps protect both the material and the child’s sense of competence.
3. The child shows interest in fitting and matching.
Putting a lid on a container, placing a peg into a hole, or trying different shapes in a sorter all provide related experiences. The cylinder block offers a more refined version of this exploration.
4. The child can remain with a simple activity briefly.
The first presentation may last only a few minutes. That is enough. Readiness does not mean sitting still for a long lesson; it means having some capacity to return attention to the task.
5. The child can tolerate a small mistake.
The material is designed to reveal errors. A cylinder will not fit the wrong socket, or another piece will be left without a matching space. A child who can try again with gentle support is likely to benefit from the built-in feedback.
6. The child is beginning to imitate slow, deliberate movements.
If the child watches an adult carry a tray carefully, turns pages one at a time, or copies a simple placing action, a brief demonstration may be more useful than a verbal explanation.
A child who is active, curious, and not yet ready to complete the whole block can still have a meaningful introduction. You might offer one or two cylinders for transferring, invite the child to remove pieces from a single block, or demonstrate the work and allow observation. The aim is not to force a full cycle before the hands and attention are prepared.
Common signs to pause or simplify
If a child immediately throws the cylinders, mouths them, becomes distressed by the mismatch, or repeatedly sweeps the pieces away, the material may be offering too much challenge at that moment. This is not a failure. It is useful information.
Try reducing the number of pieces, changing the time of day, or returning to a larger and simpler fine-motor activity. A child who is hungry, overtired, overstimulated, or adjusting to a new environment may not be able to show their best concentration.
Rigid age-gating can be unhelpful in both directions. Offering the material too early because it looks advanced can create unnecessary frustration. Withholding it from an older preschooler because they do not complete it immediately can also miss the child’s learning pathway. Observe the hands, the attention, and the emotional response.
Prepare the space before you invite the child
The physical setup quietly teaches the child how to approach the work. A crowded table with several colourful toys nearby sends a different message from a clear mat with one material placed neatly at the centre.
For a first presentation, use a small table or a low floor mat in a quiet part of the room. The child should be able to reach the block without leaning heavily across the work area. Leave enough space to place one cylinder at a time without knocking against other objects.
A simple Montessori sensorial cylinder block setup usually includes:
- one cylinder block, rather than all four at once;
- a clear work surface;
- enough room for the block and the removed cylinders;
- a stable chair or comfortable floor position, if the child prefers sitting;
- no unrelated toys within immediate reach;
- a shelf or storage place where the block can be returned afterwards.
The first block should be chosen with the child’s current experience in mind. If the child is new to the material, begin with the variation that presents a clear and manageable visual contrast. Avoid turning the introduction into a test by presenting all four blocks together and asking the child to solve them independently.
In classroom practice, the presentation itself is part of the learning. Move slowly enough for the child to see the sequence. Carry the block with two hands if needed. Place it down carefully. Remove a cylinder by its knob, pause, and return it to the socket with a controlled movement.
You do not need to narrate every action. Too much language can pull attention away from the tactile feedback. A few simple words are enough: “This one fits here.” “Let’s try another.” “You found the space.”
Present the cylinders as a movement sequence
Young children often learn more from the rhythm of an action than from an explanation. A calm presentation gives the child a model for how to use the material without taking over the discovery.
A practical first presentation can follow this order:
1. Invite the child to the work area.
Keep the invitation uncomplicated. Tell the child that you are going to show how the cylinders work, rather than asking them to perform immediately.
2. Position the block securely.
Place it so the sockets are easy to see and the child is not forced to reach across the block.
3. Use the knob for each grasp.
Pick up one cylinder with the thumb and first two fingers. This is a natural demonstration of the pincer grip without turning the lesson into handwriting practice.
4. Remove a small number of cylinders first.
You can take out a few pieces and place them beside the block, keeping them close enough for the child to compare the shapes.
5. Return each cylinder deliberately.
Match the cylinder to its socket without rushing. If the child is watching, allow a pause before moving to the next piece.
6. Offer a turn.
Let the child choose one cylinder. Resist correcting the hand position unless there is a safety concern or the grasp makes the task impossible.
7. Allow the material to give feedback.
If the child tries the wrong socket, wait. The mismatch is part of the lesson. A brief prompt such as “Try another space” is usually enough.
8. End while the child still has some interest.
The first successful experience does not need to include every cylinder. Stopping calmly helps the child remember the work as manageable.
The adult’s role is scaffolding, not constant rescue. You are making the task accessible, then gradually stepping back so the child can coordinate perception and movement independently.
Why the knobs matter
The small knobs are not decorative handles. They invite a grasp using the thumb and first two fingers, which develops hand control relevant to later tool use. This is often described as indirect preparation for writing.
It is best to keep that connection modest and accurate. Cylinder blocks do not teach letter formation, pencil control, or written language by themselves. What they offer is repeated practice in a particular kind of controlled grasp, along with visual discrimination and careful release. Those experiences can sit within a broader foundation for drawing, using tools, and eventually writing.
You may see a child first use the whole hand, then shift toward fingertips, then pick up the knob with increasing precision. That progression is valuable even when the child is not yet completing the block in the expected sequence.
Let the control of error do its work
One of the most powerful features of Montessori cylinder blocks is their built-in control of error. Each cylinder has a corresponding socket. If the child places a cylinder in the wrong opening, the fit will reveal the mistake. Another cylinder may then be left without a suitable space.
This gives the child information without requiring an adult to say, “That is wrong.” The child can look, feel, compare, and try again. That quiet feedback supports problem-solving and emotional regulation because the correction comes from the material rather than from adult judgement.
The control of error is not the same as a toy making every decision for the child. The child still needs to notice the mismatch and decide what to do next. Some children will immediately remove the piece and try another opening. Others will need time, a visual pause, or a simple invitation to look again.
What to do when a cylinder does not fit
When a piece is in the wrong socket, try this progression:
- wait for a moment before speaking;
- observe whether the child notices the mismatch independently;
- if needed, say, “It is not going all the way in,” without labelling the child’s attempt as wrong;
- invite the child to compare the cylinder with another opening;
- demonstrate only if the child is becoming frustrated or has lost the purpose of the activity.
Avoid rearranging every piece while the child watches. That may produce a completed block, but it removes the most important learning opportunity: the child discovering the relationship between size and space.
The control of error also helps adults observe. If a child repeatedly chooses a cylinder based only on height while ignoring width, that tells you something about the dimension they are currently noticing. If the child can match pieces but struggles to remove them with a pincer grasp, the next support may be fine-motor practice rather than more complex visual work.
A wrong fit is not a dead end in this material. It is the conversation between the child’s hand, eye, and the wooden socket.
Separate the blocks instead of teaching the whole set at once
A complete set can look inviting to an adult and overwhelming to a young child. Forty cylinders offer many possible comparisons, but the developmental value comes from isolating one challenge at a time.
Begin with one block. Once the child understands the basic movement and shows interest in repeating it, you can introduce another block on a different day. Keep the first block available for repetition rather than replacing it immediately with a more difficult variation.
This is especially useful when the child is learning that visual size can be deceptive. With the block where height and diameter change inversely, the tallest piece is the thinnest. A child may confidently reach for the tallest cylinder and expect it to fit the largest-looking space. The material then offers a rich opportunity to compare two dimensions rather than relying on one visual feature.
Knobbed cylinders should not be treated as interchangeable with knobless cylinders. Knobless cylinders do not have the same socket-based control of error and are generally introduced later, once the child has more experience with visual grading and handling the material. They may support related discrimination, but the learning conditions are different.
Use observation to decide what comes next
After the first play, note what the child actually did rather than whether the block was completed.
You might observe that the child:
- removed every cylinder but lost interest during replacement;
- matched most pieces but used a whole-hand grasp;
- watched the presentation closely without taking a turn;
- repeated one favourite cylinder several times;
- noticed an incorrect fit and corrected it independently;
- needed help carrying the block but worked confidently once seated;
- became frustrated when several pieces were mixed together.
Each response suggests a different next step. A child who enjoys removing and replacing pieces may simply need repetition. A child who is fascinated by the knobs may benefit from other activities that strengthen pincer control, such as large peg work or transferring objects with suitable tools. A child who is drawn to ordering may be ready to compare two blocks, but only when the first pattern feels familiar.
Do not turn observation into a scorecard. The purpose is to understand the child’s current pathway so that the material remains challenging without becoming defeating.
Extend the play without diluting the work
Once the child has had repeated experiences with the blocks, you can gently extend the learning:
- invite the child to carry the block from the shelf to the mat;
- offer a choice between two blocks and observe which variation attracts them;
- ask the child to place the cylinders beside the block before returning them;
- use simple descriptive language such as tall, short, wide, and narrow;
- pause after a mismatch and let the child compare rather than supplying the answer;
- invite the child to return the material to its shelf when finished;
- revisit the same block after several days instead of continually adding novelty.
Language should follow the child’s action. If a child is holding two cylinders side by side, you might say, “This one is wider.” If they are comparing the pieces by height, “You found the taller one” gives useful vocabulary without interrupting concentration.
Avoid quizzing. Questions such as “Which one is the biggest?” can shift the child from exploration into performance. A calm observation often preserves more engagement than a string of tests.
Typical mistakes adults make at first
The most common errors are not dramatic. They come from trying to help too much, too quickly.
Offering all four blocks immediately
This makes the activity look complete but can blur the developmental purpose. One block gives the child a clearer field of attention and lets you see which dimension they are noticing.
Correcting every mismatch
If you point out each incorrect placement, the child may begin waiting for your judgement instead of using the control of error. Give the material a chance to communicate first.
Demonstrating at adult speed
Adults often move through familiar actions without noticing how quickly they are going. Slow down enough for the child to see the grasp, the lift, the comparison, and the replacement.
Adding too many words
A long explanation cannot replace tactile feedback. Use short, concrete language and leave room for the child’s hands to work.
Treating completion as the only success
Completion is one possible outcome, not the entire purpose. Careful grasping, sustained attention, noticing a mismatch, and returning to try again are all meaningful progress.
Using an unverified miniature set with a mouthing child
Non-standard toddler cylinder blocks vary widely. If the product contains small detachable parts, check the specific manufacturer guidance and consider whether the child can handle the pieces safely. Do not assume that a reduced-size set is automatically suitable for a younger age.
A calm pre-play checklist
Before inviting the child, take a moment to run through the essentials:
- The set has been inspected for rough wood, loose knobs, unstable blocks, and debris.
- You know which dimensional variation the chosen block presents.
- The child can handle the small pieces safely and is not likely to mouth them.
- The work area is clear, stable, and free from unnecessary distractions.
- Only one block is available for the first presentation.
- You have enough time to model the movements without rushing.
- You are prepared to wait through a mismatch instead of correcting immediately.
- The activity can end after a short, positive attempt.
- The block has a clear place to return to when the work is finished.
This checklist is not a script. It is a way to protect the conditions that make sensorial work valuable: order, repetition, movement, and the child’s growing independence.
The real preparation is the adult’s pace
Montessori cylinder blocks are precise materials, but the child’s experience does not need to feel rigid. The block provides structure; your role is to make that structure emotionally safe and physically accessible.
When the set is sound, the space is quiet, and the presentation is restrained, the child can begin to build a relationship between what the eye sees and what the hand feels. A cylinder is too wide, too short, too tall, or just right. The child does not need a lecture to understand this. They need time, a manageable number of pieces, and the freedom to discover the answer.
Prepare the material carefully, introduce one challenge at a time, and treat mistakes as information. Then extend the play through repetition, descriptive language, and opportunities for the child to carry, choose, compare, and return the work independently. That is how a wooden sensorial material becomes more than a fitting exercise: it becomes a small, steady practice in attention, coordination, problem-solving, and confidence.